What to do next
Importing and Compiling
Section titled “Importing and Compiling”If all went well, you should now have a link to a git repository containing your ZMK configurations. Go to https://github.com/new/import and import the repository into your GitHub account. Your GitHub repository should be ready in a few minutes after clicking “Begin import”.
The git repository hosted by Shield Wizard is only kept for 24 hours, make sure to import it before then.
A GitHub Actions workflow is included in the repository to compile the firmware on GitHub. It will run automatically when you push changes to the repository, but for the initial build, you will need to manually trigger it:
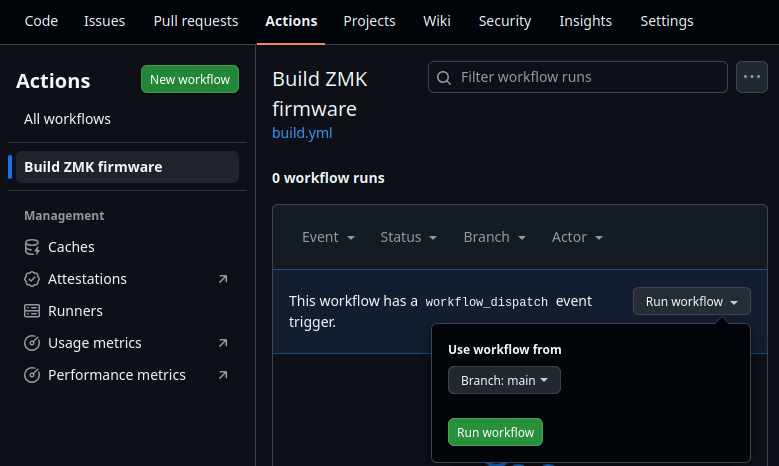
- Go to the “Actions” tab of your newly imported repository.
- Select the “Build ZMK Firmware” workflow from the left sidebar.
- Click the “Run workflow” button on the right side, then click the green “Run workflow” button in the popup.
You don’t need to manually trigger the workflow for future changes, it will run automatically.
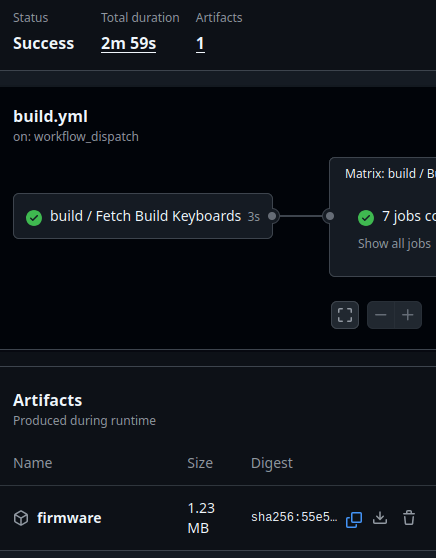
After a few minutes, the workflow should complete successfully. You can then download the compiled firmware from the “Artifacts” section of the workflow run.
Shield Wizard shouldn’t generate any invalid configurations, but if the build fails, please send feedback to Shield Wizard GitHub repository or join the ZMK Community Discord for help.
Test the Firmware
Section titled “Test the Firmware”You should test the firmware on your keyboard before changing anything. The default keymap generated by Shield Wizard is a sequence of A, B, C, … Z then looping back to A. It’s perfect for verifying that all keys are working correctly.
In addition to the firmwares for your specific keyboard, we also added a “settings reset” firmware for your convenience.
All controllers Shield Wizard currently supports have UF2 bootloaders. To flash the firmware:
- Double-tap the reset button within 0.5 seconds to enter bootloader mode. The controller should appear as a removable drive on your computer.
- Don’t have a reset button? Short the
RSTandGNDpins twice within 0.5 seconds with a jumper wire or tweezers.
- Don’t have a reset button? Short the
- Copy the coorresponding
.uf2firmware file to the removable drive. The controller will automatically disconnect and reboot with the new firmware.
You should now test the keyboard over USB and BLE (if applicable). For split keyboards, only the first part (usually the left side) will have USB connectivity, all other parts only talk to the first part over an internal BLE connection.
Compile options
Section titled “Compile options”After you have verified the basic firmware is working, you can start customizing it further.
If you want to build with ZMK Studio support or compile firmware for the dongle setup, you need to modify build.yaml in the root of the repository.
Shield Wizard generates build.yaml with some builds commented out.
Uncomment the sections you want to enable by removing one single # at the start of each line and nothing else. YAML is very sensitive to indentation (amount of spaces on each line), removing or adding spaces may result in invalid YAML syntax.
ZMK options and keymap
Section titled “ZMK options and keymap”Change ZMK options and keymap by editing files in the config folder.
Things you may want to change:
- A new keymap https://zmk.dev/docs/keymaps#keymap-file
&btin the keymap to manage Bluetooth connections https://zmk.dev/docs/keymaps/behaviors/bluetooth- Battery reporting and battery proxy https://zmk.dev/docs/config/battery
- Deep sleep for improved battery life https://zmk.dev/docs/config/power
- USB Boot protocol to use the keyboard in BIOS/UEFI https://zmk.dev/docs/config/system#usb
“github.dev” (made by GitHub) is a better editor than the standard GitHub web interface. You can open your repository in “github.dev” by going to https://github.dev/<your-username>/<your-repo>.
Keymap Editor is a web-based keymap editor for ZMK, it intergrates with GitHub and can directly edit the keymap file in your repository. Shield Wizard generates the layout json file required by Keymap Editor to render your keymap.
ZMK Studio can edit keymap at runtime over BLE and USB, but it lacks some features compared to editing the keymap file directly.
Useful links
Section titled “Useful links”- ZMK documentation: https://v0-3-branch.zmk.dev/docs
- ZMK Community Discord: https://zmk.dev/community/discord/invite
- Shield Wizard GitHub repository: https://github.com/Genteure/zmk-wizard
- ZMK Studio: https://zmk.studio/
- Keymap Editor: https://nickcoutsos.github.io/keymap-editor/
Please star the Shield Wizard repository if you find it useful, and star the ZMK repository as well!